Honda forums unlimited! - feel free to post - Timing belt snapped - Prelude 2.3Si 1996
- Home
- Forum
- Cars
- Honda forums unlimited feel free to post
- Timing belt snapped Prelude 2 3Si 1996
Forum -> cars -> Honda forums unlimited! - feel free to post
Timing belt snapped in my 1996 2.3 si prelude. My boyfriend is a mechanic and is going to fix i..
Timing belt snapped in my 1996 2.3 si prelude. My boyfriend is a mechanic and is going to fix it but I am without a manual.
Can somebody please provide me with and installation instuctions for this job and also for the water pump?
Water pump is straight forward, after removal of timing belt it can be taken out after removing the holding bolts.
Removal
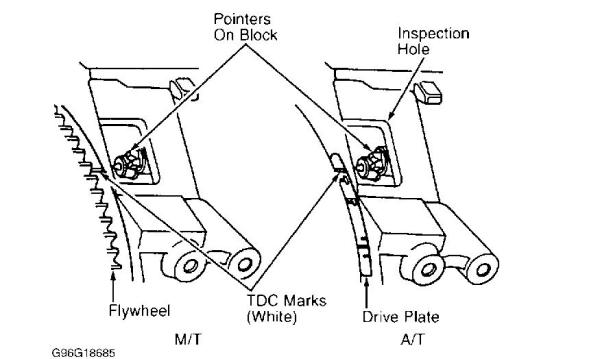
1. Disconnect the negative battery cable. Rotate crankshaft counterclockwise so that cylinder No. 1 is at TDC of compression stroke. Timing marks are viewed through window on transaxle-to- engine mating flange. 2. Remove engine lower splash shield. Remove power steering pump and alternator drive belts. Remove alternator terminal and connector. If equipped, disconnect cruise control actuator electrical connector. Move cruise control actuator out of way with cable attached.
3. Support engine with floor jack. Remove engine side mount and bracket from front of engine. Remove dipstick tube from front of engine. Remove cylinder head cover. 4. Remove middle timing belt cover. Remove crankshaft pulley. Loosen belt tension adjusting nut. Push belt tensioner to release tension from balancer belt. Tighten adjusting nut. Remove balancer shaft and camshaft timing belts.
Installation
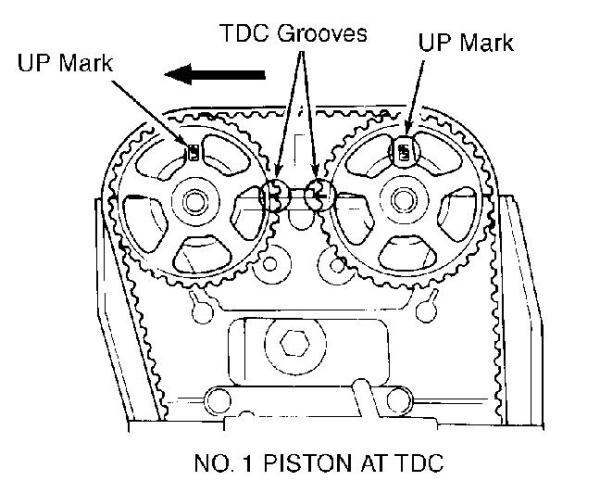
1. Align White mark on flywheel or drive plate (flexplate) with pointer on block. Ensure camshaft(s) is at TDC for No. 1 cylinder.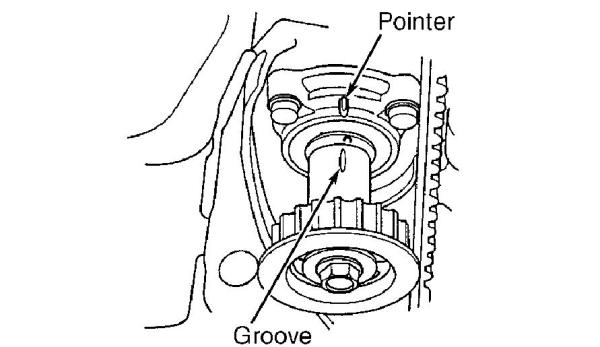 Install camshaft timing belt.
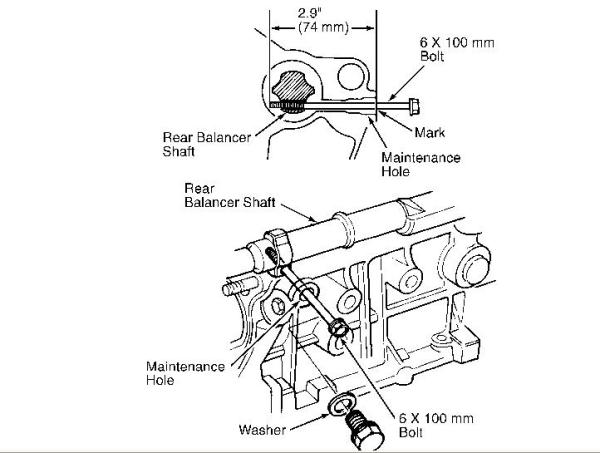
 1. Align rear timing balance shaft belt pulley by inserting a 6 x 100 mm bolt 2.9" (74 mm) into alignment access hole. Align groove on front balance shaft pulley with pointer on oil pump body.
2. Adjust timing belt tension by rotating crankshaft counterclockwise until No. 1 piston is at TDC of compression stroke. Loosen, but do not remove, timing belt adjustment bolt. Rotate crankshaft counterclockwise 3 teeth on camshaft pulley to create tension on timing belt. Tighten adjustment bolt to specification.
3. Reverse removal procedure to complete installation. Tighten crankshaft pulley bolt to specification, 150 ft/lbs.. Adjust drive belts to proper tension.
You need to compress the timing belt tensioner before installation if it is the auto type.
 Thanks Alex for such generosity.. It's just like the chilton auto repair manuals.. Keep up the good work.. Thanks again..
Forum -> cars -> Honda forums unlimited! - feel free to post
![]()
![]()


